

I went to the zoo a few weeks ago with the
intentions of shooting some reference photos for a tiger painting. Unfortunately the big cats did not make very
interesting subjects and I could not get any good shots of them. However the vulture and komodo dragon were
awesome and I got a lot of great shots.
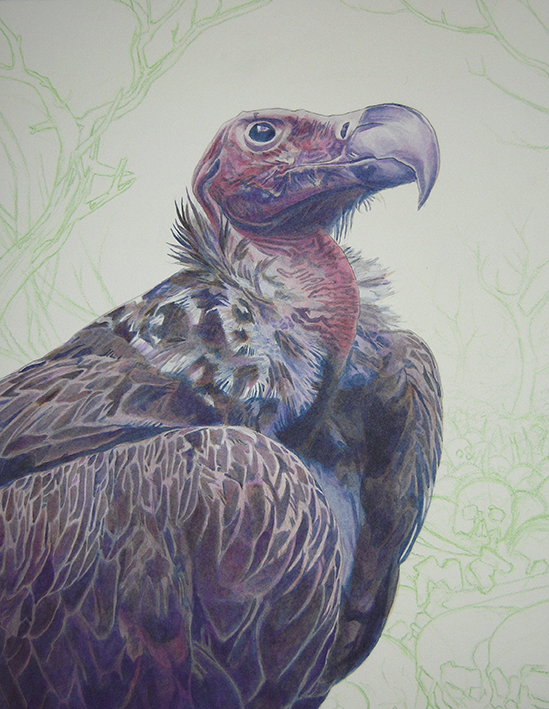
In the vulture reference photo you can see I got right up on the cage,
he stood there for a good half hour only turning his head every now and
then.

I did my drawing a little different this time and
decided to draw the background elements using a colored pencil. This was done because I knew the background
needed to be lighter in value and graphite is too dark (don’t want to do too much
erasing). I used a green colored pencil
since I knew the background would be moving towards neutral yellowish greens on
the color wheel. The foreground would
consist of analogous colors of violet, magenta and red.

As I mentioned in previous posts, I like to start
on the darkest areas first. Whether or
not those values are in my background or foreground doesn’t matter to me. This is what works best for me; I think most
people might be more comfortable always painting their background first. Paynes grey is the color I use for my
underpainting on the foreground.

I decided to use an earth tone on the feathers
(burnt umber) rather than jumping in with violets right away. I wanted the bulk of the vultures feathers to
be much more neutral in comparison to the colors around his head.

Here I layed in some alizarin crimson on the vulture’s
head and neck. I knew that as I began to
put other colors in there, it would shift more in the direction of red
violet.
At this stage, I used dioxazine purple the same way
I used the paynes grey. When I painted his
head and beak, I payed very close attention to my reference photo. In the photo, you can see that his lower jaw
is much more violet than the rest of his head.

I went ahead and put some green gold on his beak and
around his eye. You may notice that I
painted his head much darker than how it is in my reference. This is mostly a contrast issue so the head
of the vulture pops off the white of the board better. Also at this stage, I went ahead and darkened
areas that needed it using paynes grey before heading onto the
background.

I started painting the background using sap
green. Sap green can get ugly and
saturated quickly so I was careful to thin it down.

I did some light gradient washes with burnt umber to
create a fuzzy halo around my subject.
This is to make sure that areas around his head are lower in contrast.

I darkened some of the background elements using
primary magenta. I also added some lighter
ghostly branches using a watered down mixture of magenta and green gold.

A lot of the background elements were not dark
enough for me so I used dioxazine purple to add a little more value to those
areas. As mentioned in previous posts, I
keep paynes grey out of my lightest area (in this case, the
background).
When I feel all the foreground and background
elements are where they should be as far as color and value are concerned, I
head on to opaques. Most of the opaques
are on the background and around the vulture’s head and neck. I used titanium white mixed with a little
green gold on the largest tree branch and the pile of bones. I used mostly pure titanium white on his head
and neck but I am careful to thin it out so it has a little transparency. Finally, I used titanium white, green gold and
a little bit of phthalo green in his eye.