Saturday, May 2, 2015

Process for Rabbit Ambush and Rocket Raccoon


For this painting, it was crucial that the planning was carefully thought out because there were many elements in the composition that needed to be separated from each other.  To separate all the elements, maximum contrast is very important.  The areas in the composition that needed separation were the rabbits, the wolf, the large tree, the grass, the trees behind the wolf and the treeline in the distance.


You can see my initial idea in the thumbnail.  I changed the pose of the wolf character because I thought it felt stiff and awkward.  By changing the pose I altered the story from a protagonist searching for a rabbit assassin, to a protagonist being aware of one rabbit but oblivious to the danger behind him.


This is the reference I looked at when I created the line art and when I started my painting.  I liked the otter sitting in grass because it shows what long grass looks like when something is sitting in it.  The trees, weapons and rabbits I drew from my imagination.


My initial drawing was somewhat of a disappointment - the turns/angles on the armor did not look right and the wolf's head was way too low.


Here in the inks you can see I altered the armor some and I raised the wolf's head a little more.


As I mentioned before, contrast is very important especially when there are a lot of elements in the composition that need to be separated from each other.  Black, white and grey comps are crucial for this part of the planning.  I knew that I wanted the large tree with the rabbit as well as the wolf to register as black.  The other two trees and the grass I wanted as a dark grey.  All other elements in the distance needed to be light grey or white.


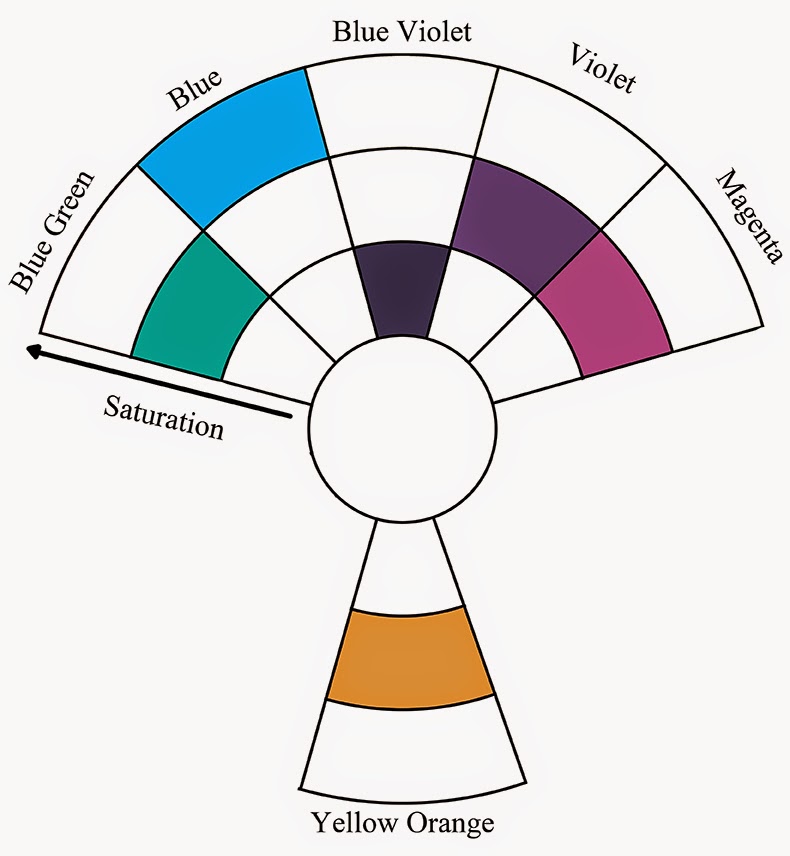
After I had a good understanding of the overall values in the composition, I began thinking about color.  This color theory is similar to the one I used on my phoenix painting except I have used pure blue on the subject (wolf's eye) instead of turquoise.  I like to use color theories like this a lot because with yellow-orange, I can get maximum contrast and it looks good against neutral blue-violets.


Once I knew the color theory I intended to employ, I was ready to colorize my lines.  I printed this one out and started painting but after five hours of work, I realized that the wolf's head was still too low so I went back to the line art for corrections.


When I draw wacky cartoon characters, it is still important that they have believable proportions.  I could not continue painting knowing that the wolf's head looked sunken into his shoulders.  You can see in this image that I raised his head about half an inch.  I also got rid of one the plates of armor on his left arm (axe arm).  That plate of armor is flat and should not curve around or be visible.  The change on the armor was a minor nitpick but I felt it had to be done.


When I started my painting, I first did an underpainting on the wolf, the grass, the large tree and the rabbit in the foreground.  I only used payne's gray on those areas.  I then used dioxazine purple on the same areas again.  I also used dioxazine purple to do an underpainting on the other two trees and the second rabbit.  Once I had the underpainting established, I began working background to foreground using light transparent veils of paint and steadily the values in the foreground became darker.  Opaques were of course the final step in the painting and ninety percent of them are on the wolf character.  I used a little bit of opaque paint on the rabbits' eyes to make them appear to glow some.  I glazed pure phthalo blue over titanium white for the wolf's eyes.


Here is the least successful of the two paintings but I figured I would discuss it anyway.  As far as contrast and value are concerned, the painting does well.  But the color theory falls apart in some places mostly because I chose red for my subject.  Red is a tricky color because it does not like going too light nor does it like going too dark.  On a scale of one to ten, red likes staying at a five.  It is difficult to get high contrast with a stubborn color but I gave it my best effort.


I love the character Rocket Raccoon.  I had to create an illustration of him after I saw the movie.  HAD too.  I sketched this thumbnail in my sketchbook.  I wanted to go a humorous and violent route with the theme.


Here is the reference that I looked at.  I wanted to look at real raccoons when drawing and painting Rocket's head and tail.  For the costume I looked at some concept art from the movie.  I looked at some machine guns and rifles, but I mostly designed them using my imagination.  I looked in the mirror and posed when I drew his arms.  The rest of the elements in the composition all came from my head.


Here is my pencil drawing followed by my inks.  Before I inked it, I did shrink Rocket's head since it looked a little too big.


Here is my comp, color theory and colorized line art for the painting.  I think having yellow green in the background was fine, it just needed to be desaturated a little more.  I also think that it would have been better to use another color like magenta or blue for the subject of the piece.


Overall I have learned a lot from creating both paintings.  Despite my disappointment with the rocket raccoon painting, I am still glad I took the leap and tried a more challenging color theory.  This does not mean I am going to avoid the color red in future paintings, it just means I need to plan more carefully if I wish to employ it in my subject.


Saturday, April 18, 2015

Rabbit Ambush and Rocket Raccoon


Here is the latest painting I created.  It is approximately 12 by 21.5 inches and I painted on coldpress watercolor paper using fluid acrylics. This was a challenge to paint because of the overall composition - all the elements needed to be separate from each other using contrast.  The wolf has the darkest values and the most contrast around his head since he is the subject of the painting.  The wolf also has 95% of all the opaque paint as well as the most saturated color.  His eyes are a super-saturated phthalo blue.  The remaining opaque paint is in the rabbits' eyes to make them appear to glow.


Rocket Raccoon is the other painting I worked on and to me it is not as successful.  I did a lot of experimentation using color because I wanted to create an image dominated by green.  I think it got a little muddy is some places.  The saturated green in the trees competes for our attention when we should be focused solely on Rocket.  Despite my disappointment, it was still amusing to draw and paint such crazy subject matter.  One day in the near future, I hope to create an image dominated by green or red and be satisfied with the results.

I on occasion like to explore cartooning.  One day I hope to put together a story both written and illustrated by myself.  It is an ambitious project but I think it could be fun to self-publish a book in this illustrative style.  I may have to simplify the drawings for the interior pages, it is going to require more sketching to come up with a more solid design for these strange characters.

I will post again in the near future and go into detail for my process for these paintings. 

Saturday, November 29, 2014

Phoenix Painting


With this painting I changed my process some and tried painting on a new surface.  I love painting birds and wildlife, but I did not want to create a standard portrait as I did before.  I wanted to create something a little more dynamic, exciting and not so realistic.


I first created a small thumbnail to give myself a basic idea for the composition.  I also made a small black, white, grey comp so I had an understanding of the overall values the piece would have.  I scanned the thumbnail, changed the lines to a light blue and then printed it out on a sheet of bristol.  I decided to work at 12” x 18” with a quarter inch bleed.


Here are some of the reference photos that I used.  A lot of the drawing I had to make up, particularly the talons and the head of the bird.  The flowers and leaves were just to frame the bird and most of it was drawn from my head.  I have learned that flowers are quite easy to draw and render.  A flower’s proportions can be distorted or stretched and it will still look like a flower.


My drawing was done with a blue col-erase pencil.  I like doing this because the blue lines can be blasted away in photoshop.


I mostly did the inking with a nib and holbein drawing ink.  I also used a few pitt pens as well as a brush pen for the much thicker lines.  After scanning it, getting rid of the blue pencil lines is quite easy.  In photoshop, go to image > adjustments > black & white.  Take the blue and cyan sliders all the way down to get a nice, clean drawing.  You can then use levels or curves to darken the remaining lines and blast away any remaining mess.

I printed out small versions of my inked drawing to do several more black, white, grey comps.  It is important that when you squint your eyes at the painting, that these overall values become apparent. 


The “Y” is something I like to do when I use the color wheel.  Here you can see my overall color theory for the hawk.  Colors toward the middle of the wheel are desaturated while colors on the outside are at their purest.  The saturated blue-green is for the subject of the painting which is the hawk’s eye.


After I studied the color wheel, I then colorized the inked lines in photoshop.  I knew the fire around the bird would be a hot yellow and it would gradually turn to orange followed by magenta.  The background elements are gray so I did not want any of the lines to be black.  I wanted the hawk to pop off the background so I kept those lines black.  I printed the lines on 140 pound cold press watercolor paper.


I did not document the painting this time with day by day photos, but I still followed the same procedure of painting the darkest areas first followed by the lightest areas.  Before I even started painting the hawk, I did a wash of paynes gray over the whole figure so I could trick my brain into painting more dark than I would on a white surface.  The only opaques in this painting are around the subject – the head, beak, eye and some of the feathers on the wings.  The eye has a pure “teal” color which is nice and opaque right out of the tube.


What you see in the previous image is the unaltered scan of the painting.  Warm colors scan perfectly fine but paynes gray hates being scanned – the blues show up way too saturated.  I had to do a color and saturation layer to tone down the blues in the feathers.  I was careful to mask off the background elements.  I did a separate layer to boost the saturation of the teal color in the hawk’s eye.  Finally I did a little bit of levels (since acrylics scan a little dark) to bring back more contrast.

Saturday, March 8, 2014

Wolf Acrylic Painting


With this post, you will be able to see a day by day process for my wolf acrylic painting.  Recently, I had to manage my time better since I do not always have the time to work on my art.  What I decided to do is set aside 2 to 4 hours each day to work on my own drawing or painting.  Each image represents 2 to 4 hours of work for that day.  What I’ve noticed is that with a designated time slot, I am more focused and I seem to get more done.


For this wolf painting, I actually had to do a black, white and grey comp first since I was not going with a dark foreground against a light background as I did with previous work.  I knew that the highest contrast would be on the wolf itself with dark areas of fur next to light areas of fur.  I also knew that the background would consist of dark grey and light grey values but no bright whites.  The lightest areas would be reserved for the wolf only.  This particular comp is not the prettiest but it gets the job done.  It is always better to spend a couple of minutes on a comp instead of getting frustrated on the actual painting because you are unsure of overall values or color choices.  I prefer using brush pens when creating these comps since it makes the overall values more clear.


This was the first day of painting and I always start with paynes grey when working on the darkest areas first.  You should notice that I did not do a wash over the wolf since I needed to preserve light areas for the brightest parts of his fur.


Days 1 through 5 are pretty much all with paynes grey.  I like to focus on having a well rendered underpainting before putting down any color.  Again, paint is never as dark as you think it is especially when working on a white surface.  You might end up going over the same areas of your underpainting several times before it is truly dark enough.  


This is when I started throwing down color.  I first put down some dioxazine purple because I did not want the oranges to become too saturated.  I find that painting on top of paynes grey and purple tones makes sure that whatever color you are adding does not become too garish. Painting on top of paynes grey alone never seems to do the trick.  There is something about dioxazine purple that makes it a great neutralizer.  The colors that I added on top were vat orange followed by a little bit of primary yellow.   


In this photo you can see that I deepened the values in the fur and I started adding some color to his eyes.  At this point I was unsure which eye was going to be a little more saturated so at this point, they were pretty equal.  I started painting the background elements using a mixture of primary yellow, primary cyan and primary magenta.   The mixture had a little more cyan in it to move towards a desaturated green.  I used this mixture to make sure I stayed in a grey zone as far as value was concerned.  I knew the mixture I made would not be able to get as dark as paynes grey or dioxazine purple.  


In the eighth and ninth image, the background was starting to get more fleshed out although the overall painting was still not where it needed to be as far as overall values were concerned.  Once I had covered most of the surface in paint, it was possible to see that what I initially believed was dark, was actually more of a medium grey.


So far in these images I had only used transparent pigments.  In the final scan you can see all of the opaques I did which center around the wolf’s eye.  I used pure vat orange and primary yellow on the eye near the right side of the picture plane.  I decided to make that eye the subject and I dulled down the other eye with a little bit of dioxazine purple.  I did some opaques on the background particularly on the mountains and wheat field.  The wheat closest to the wolf I did more opaques on to bring them forward.  The stars in the background I did by splattering an opaque mixture of titanium white and primary cyan with a toothbrush.  After I did most of the opaques on the background, I then intensified the color by doing some washes.  I did a turquoise wash over the stars, a cyan wash over the mountains and a magenta wash over the wheat.  I did a couple more washes of dioxazine purple and primary yellow over the wheat to bring the color to the right level of saturation.  I also deepened the some of the values in the wheat and trees using dioxazine purple.  On some of the wheat closest to the wolf, I used some paynes grey to give them a little more contrast and sharpness.


Wednesday, December 11, 2013

Red Tailed Hawk Acrylic Painting


Before I start a painting, I always think about where my darkest values will be with the understanding that I will only use payne’s grey and dioxazine purple in those areas.  The lightest areas should be devoid of dark pigments to give as much contrast as possible.  Wherever I am not using payne’s grey or dioxazine purple I have to use other pigments to get those grey values.  Those particular pigments will vary depending on the color theory I choose to employ.  When you view a painting in thumbnail form or look at it from a distance and squint at it, these overall values should become apparent.  This is called black, white and grey composition.  In the case of this red tailed hawk; when squinting at the painting the darkest values are on the hawk itself (foreground).  The background contains grey and absolute white.  After I am sure of where the darkest and lightest values are, only then do I take out the color wheel.


In the case of this hawk, I knew I wanted to use payne’s grey, dioxazine purple, vat orange, primary magenta, primary yellow and green gold on the hawk.  Since my background only consisted of light grey and absolute white values, I knew the pigments I could use would be much more limited.  Because of the color theory I decided on, I chose primary magenta, primary cyan and green gold for the background elements.  With that understanding, I was ready to do a line drawing.  You can see in the scan that I drew the cherry blossoms using a red colored pencil (carmine red).  I did this because I knew that the underpainting for the background would be done with primary magenta.  Also graphite is way too dark – requiring some erasing after completing the background.


I prefer painting the darkest areas first, whether or not they are in the background or foreground doesn’t matter to me.  Because I knew my hawk would be dark, I put a light wash of payne’s grey over the dark areas of the drawing.  This was done to force me to paint darker because on a pure white surface, every mark you make will appear dark.  By putting a wash over the dark areas of a drawing, I end up wasting less time to obtain those dark values.  Otherwise, you might end working on an underpainting and then going back over it a second time to get the darker values in your comp. 


At this stage of the painting, I started to lay down some transparent color.  Always when this is done, several things become apparent – the underpainting is not dark enough and the added color flattens the image.  The first color I laid down (vat orange) seemed to make the image look garish and it was not until I started adding dioxazine purple that the image calmed down.  I used vat orange because I knew it would become neutralized.  I always prefer using color over earth tones whenever possible.  Colors that interact to form neutrals generally look better than earth tones like burnt umber.


As I mentioned, the image was flattened after putting down some color.  Because of this, I went back in with payne’s grey and deepened the dark areas of the hawk.  I also started to lay down some opaques to pop areas of the feathers and to brighten his eye.  There should always be a subject (area of focus) for a painting.  In this case, I chose to make the hawk’s eye glow using titanium white at first, followed by glazing color on top of those opaques areas.  By glazing color over titanium white, you can get the most saturated color because the pigment is not interacting with transparent colors underneath.  The color “floats” on top of the opaque paint and looks brighter being surrounded by desaturated and dark areas.


At this point, I started to paint my background using primary magenta.  I made sure to thin out the paint using water before applying it.  This was done to make sure I did not paint too dark or too saturated.  I also shifted the color of his eye to more yellow to match the color theory needed for the painting.


Originally I wanted the hazy gradient washes to be a light sky blue.  I used primary cyan and my soft Neptune brush to add in a few gradient washes.  I used a lot of water to dilute the pigment and create a light wash.  As I moved toward my subject (the hawk’s eye), I thinned out the paint more and more to preserve the white of the board around the hawk’s head.  


Because I made a conscious choice to keep dark pigments out of my background, I had to use green gold mixed with primary magenta and a little bit of primary cyan to deepen the shadows.  At first I thought that primary magenta and green gold would be enough to create a neutral brown without resorting to using earth tones.  Instead it made a fairly saturated orange so I had to add a tiny bit of primary cyan to get the neutral tone I desired.  Although you might think that two complementary colors will create a neutral tone, it all depends on the brand and quality of the paint.  It might require some experimentation to get the value and color you need.  Green gold happens to lean more towards an intense yellow (despite its misleading name) which is why primary cyan is also needed.  I also created a neutral green using the same colors to add some gradient washes just like I did with primary cyan in the previous step.


Finally in the scan of the painting, you can see all the opaques I did in both the background and the foreground.  I used quite a bit of opaques on the petals of the flowers to pop areas where the light was hitting.  I deepened a lot of the dark areas on the hawk using primary magenta and paynes grey.  But mostly I focused on the hawk’s eye – getting the glow that I wanted to portray by using titanium white and then glazing green gold on top.  I placed some intense color in the eye as well as around it to really sell the glowing feeling I wanted it to have.  All in all I like the results.  I continue to learn with each painting when it comes to applying the paint as well as color theory.  I hope to push my black, white and grey compositions further to encompass different compositions other than a dark foreground on a light background.