Thursday, May 23, 2013

Vulture Painting


I went to the zoo a few weeks ago with the intentions of shooting some reference photos for a tiger painting.  Unfortunately the big cats did not make very interesting subjects and I could not get any good shots of them.  However the vulture and komodo dragon were awesome and I got a lot of great shots.  In the vulture reference photo you can see I got right up on the cage, he stood there for a good half hour only turning his head every now and then.


I did my drawing a little different this time and decided to draw the background elements using a colored pencil.  This was done because I knew the background needed to be lighter in value and graphite is too dark (don’t want to do too much erasing).  I used a green colored pencil since I knew the background would be moving towards neutral yellowish greens on the color wheel.  The foreground would consist of analogous colors of violet, magenta and red.


As I mentioned in previous posts, I like to start on the darkest areas first.  Whether or not those values are in my background or foreground doesn’t matter to me.  This is what works best for me; I think most people might be more comfortable always painting their background first.  Paynes grey is the color I use for my underpainting on the foreground.


I decided to use an earth tone on the feathers (burnt umber) rather than jumping in with violets right away.  I wanted the bulk of the vultures feathers to be much more neutral in comparison to the colors around his head.


Here I layed in some alizarin crimson on the vulture’s head and neck.  I knew that as I began to put other colors in there, it would shift more in the direction of red violet.
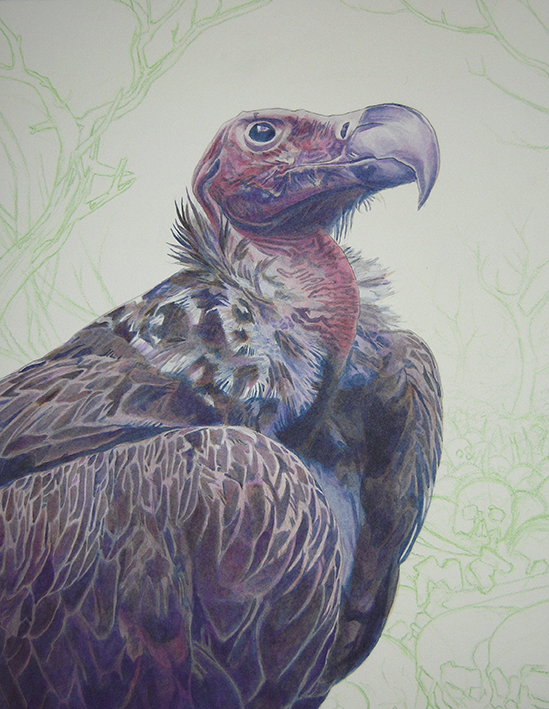


At this stage, I used dioxazine purple the same way I used the paynes grey.  When I painted his head and beak, I payed very close attention to my reference photo.  In the photo, you can see that his lower jaw is much more violet than the rest of his head.


I went ahead and put some green gold on his beak and around his eye.  You may notice that I painted his head much darker than how it is in my reference.  This is mostly a contrast issue so the head of the vulture pops off the white of the board better.  Also at this stage, I went ahead and darkened areas that needed it using paynes grey before heading onto the background.


I started painting the background using sap green.  Sap green can get ugly and saturated quickly so I was careful to thin it down.


I did some light gradient washes with burnt umber to create a fuzzy halo around my subject.  This is to make sure that areas around his head are lower in contrast.


I darkened some of the background elements using primary magenta.  I also added some lighter ghostly branches using a watered down mixture of magenta and green gold.


A lot of the background elements were not dark enough for me so I used dioxazine purple to add a little more value to those areas.  As mentioned in previous posts, I keep paynes grey out of my lightest area (in this case, the background).


When I feel all the foreground and background elements are where they should be as far as color and value are concerned, I head on to opaques.  Most of the opaques are on the background and around the vulture’s head and neck.  I used titanium white mixed with a little green gold on the largest tree branch and the pile of bones.  I used mostly pure titanium white on his head and neck but I am careful to thin it out so it has a little transparency.  Finally, I used titanium white, green gold and a little bit of phthalo green in his eye.


Tuesday, April 23, 2013

Finch Acrylics and Process

I decided to paint a finch this time, mostly because I was tired of painting oak leaves. Almost every bird painting I have done has oak leaves in the composition and it was getting old. This particular bird looks good amongst desert flora so I looked up “desert flower” and “cactus flower” to find some cool background reference. I decided to go with a blue-violet versus yellow-orange color theory again but I used it in a way that was much different. I used payne’s grey but I stayed away from primary cyan. I decided there is enough blue in payne’s grey to get the job done. I also stayed away from turquois, so mostly I used the analogous colors from blue-violet to magenta and yellow orange which is on the opposite side of the color wheel.

You can see I made some changes to the drawing if you look at the finished painting. When I held my drawing up to the mirror the petals in the upper right hand corner looked odd – they were too big. You can see in the painting that I shrunk those petals significantly. It is really important to check your composition before starting the underpainting. Holding your drawing up to the mirror is an excellent way to check compositional issues that you may have.

I used three brushes for this painting – two synthetic rounds (8 & 10) and a large 16 soft round for doing gradient washes. The 16 soft round brush is called a “Neptune” brush. It can hold a ton of water and it is very easy to get a soft, air-brushed feel with it. The underpainting is done in payne’s grey and primary magenta. You can see I painted the background with magenta instead of using an earth tone. I really wanted to push the absolute separation of background and foreground elements in this piece. By only using warm colors in my background, I accomplish this pretty easily. When doing this underpainting, I used my two synthetic rounds. There are mostly hard edges although I did apply some light gradient washes on the foreground.

When I really start to lay in color, I use dioxazine purple on both background and foreground elements. I am always consciously aware of maintaining the white of the board around the bird’s head in which his eye is my subject. Again, contrast and color are important so everything around his head needs to be the highest contrast – black and white. As we move away from the subject towards the edge of the picture plane, it needs to become lower contrast. I keep this in mind when I do my gradient washes.

I wanted his belly to be more separated from the background so I did a few gradient washes with dioxazine purple to accomplish this. Doing so brought the bird more forward; I needed his lower underbelly to be nearing a dark grey. Again, I figured this out by looking at my painting in the mirror and when I did, the value problems became more apparent.

Here I really lay in the color. Attacking the background, I use my large 16 soft round to do multiple gradient washes with vat orange and primary yellow. I apply vat orange first and I am careful to thin out the paint so as I move towards the subject, it is mostly water by that point. You must always be wary of maintaining high contrast around the subject. The vat orange and primary yellow washes end up neutralizing the magenta quite a bit, which is alright, the only true saturated color will be in his eye. Looking at my reference, I use primary yellow to neutralize a few areas on the bird. I am thinning out the yellow and applying it very lightly when I do this. I then go back in with magenta and do the same thing.

Here in the finished scan, you can see that I have done a considerable amount of opaques both on the foreground and background. I also deepened some of the dark areas with payne’s grey and dioxazine purple. When applying the opaques, I am using mostly titanium white and a little bit of primary yellow. I pay close attention to my reference and pop things that need a little more contrast. I added some acrylic flow release to my smaller jar of water to make titanium white flow a little easier. When I added the highlight in his eye, I first used nothing but titanium white then I glazed on a little bit of alizarin crimson followed by some vat orange. In my reference his eye is nothing more than a black orb which doesn’t make for a very interesting subject. Adding reflections and saturated color is a subjective decision to make a much more interesting composition.